How to start a power supply without. How to start a power supply without a computer. Converting a PSU into a variable voltage source
There are moments in life when it is necessary turn on the power supplywithout connecting it to the motherboard. There are several reasons for this inclusion. For example, check the power supply for operability or find out the noise level of its cooler.
Now all power supplies belong to the ATX standard. Such units have several "pigtails" with SATA and Molex connectors for connecting drives, several connectors for supplying power to the video card, 4-pin or 8-pin processor power, as well as 24-pin (possibly 20-pin) power supply to the motherboard.

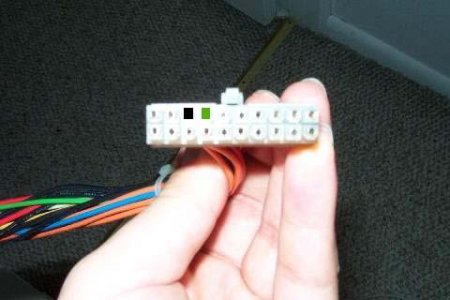
In addition, there is a latch key on the connector for connecting to the motherboard. So next to it is a black wire with a hexagonal contact. If you turn the loop down with the locking key and count the fifth contact from right to left (it can be signed as COM or GND), then this will be it. There is a green wire next to this COM pin, in the same row. This is the only wire and can be referred to as PS-ON on the loop. If in doubt, turn the loop down again with the locking key and count the fourth contact from right to left.
This method of finding the desired contact is universal and does not depend on the number of contacts on the loop. Whether it's 24-pin or 20-pin. By the way, there are power cables with detachable 4-pins. They are also labeled 20 + 4-pin.
It may be that you have a Chinese power supply from an unknown manufacturer and the green wire is missing. Do not worry. The order of the wires does not change from this.

Now you need to take a small a piece of wire or a paper clip, expose its edges. One end is connected to the fourth pin and the other to the fifth pin. Although you can connect another contact to any of those that have a black wire. For example, to the third pin.

Now you can turn on the power supply by connecting it to the network. The power supply will work immediately. You will recognize this by the rotation of its cooler. If the power supply has a controlled cooling system, in which the cooler does not rotate at low loads, then try connecting a cooler from a system unit or an optical drive. This will also help ensure that the power supply is in working order.
How to turn on a computer power supply without a computer?
It can work in this mode no more than 5 minutes. After all, such a mode of operation, without load, should be short. So before plugging into the network, connect either a cooler or a disk drive, or a hard drive. Check what worries and turn it off. Read more interesting tips in the section
If you want to check the operation of the power supply, but you do not have a computer, then there is one way to do this. All you need is a pair of wires and a single pole switch that stays on or off when you change position. Below we will show you how to do this.
Standard ATX power supplies are not designed to be idle unless they are properly connected to the motherboard. This ensures that they cannot damage computer components if the connector is not fully plugged in or plugged in incorrectly.
Note: under no circumstances switch on the power supply without load! This can lead to its complete failure. The load can be either a resistor or a connected drive, floppy drive, hard drives.
Another problem is that if you plug the power supply into the mains, it simply won't initialize. It will wait for the trigger signal from the motherboard to turn on (usually the signal is controlled by a button on the front of the computer). The article describes the direct initialization of the power supply by shorting the corresponding connectors.
Prepare two long pieces of wire to connect to the switch and power connector (20 or 24 pin connector).
Strip the insulation from both ends of each wire, leaving enough wire to wrap around the power button (or solder). At the other end, expose a strip large enough to make sure it makes contact with the 20- or 24-pin connector on your power supply.
Wrap the long end of the bare wire around the switch and repeat this process with the other wire. Place the switch in the "OFF" position.
Power off the computer and remove the power supply connector.
Hold the 20- or 24-pin power adapter plug in one hand. Find the green wire (the ATX motherboard signals the command to start the power supply through "PS_ON #", which is indicated by the green wire). This is pin number 16 on a 24 pin connector and pin number 14 on a 20 pin connector. Find the black wire (GND) on the 20/24 pin connector. It is usually next to green.

Note: each row has one green wire, it doesn't matter which one you use, they both serve the same function.
Insert one end of the prepared wire from the switch into contact with the green wire. Insert another wire pin to the black wire.
Plug in the AC adapter and then flip the switch to the ON position. The power supply will turn on and you can now use it to power devices or for testing purposes.
To make sure the power supply is working properly, you can measure the output voltage with a multimeter. The drawing above shows the output voltage of each pin (+12 V, +3.3 V, +5 V, COM). Pin 13 can be either + 3.3V supply or can be used as a power supply sensor to measure cable loss.
In this simple way, you can easily, and most importantly, safely turn on your power supply without a computer.
Many computer enthusiasts have a question: "How to turn on the power supply without a computer?" This need is due to various reasons, most often we are talking about checking the operability of cathode lamps or new coolers.
Why such difficulties?
It is simply necessary to turn on the power supply without a computer in case of its repair, because if you constantly turn off and turn on the computer, this will negatively affect the PC components, due to premature breakdown of the batteries. In addition, any experiments with a computer may lead to unstable operation of the operating system.
First start
As computer wisdom says, if you could find a PC power supply, how to turn it on is even easier to understand. All modern computer units comply with ATX (special international standard). Thus, a 20-pin connector has a contact that is responsible for the active state of any such unit. This is the fourth contact from the left (you need to count from the fastening latch). Most often, the contact we need is green. This wire must be tried to be connected to the ground (i.e., any black wire). It is most convenient to use the adjacent, 3rd contact. If everything is done correctly, the power supply will instantly revive and the cooler will make noise.
How to turn on the power supply without a computer: details
ATX devices can provide the following voltages: 3.3, 12 and 5 V. In addition, they have a good power (from 250 to 350 W). But the question is: "How to turn on the computer power supply?" Above, we have already, so to speak, outlined the procedure in a nutshell, and now we will try to figure it out in more detail.
In the old days it was easier

Curiously, the old AT blocks could be run directly. With the ATX standard, everything is much more complicated. However, the solution to a huge problem comes down to a small wiring that needs to be connected in a certain way. We have already described how to turn on the power supply without a computer, but we ask you to disconnect all wires going to the motherboard, hard drives, drives and other components. Better yet, remove the element we need from the system unit and work away from it.
Another important point that should not be overlooked: do not force the power supply to idle. You can thus shorten his life. It is imperative to give a load. For this purpose, you can connect an old hard drive or fan. As noted, you need black and green contacts to start. However, remember that some manufacturers for some unknown reason refuse to follow the established color coding. In this case, it is advisable to first carefully study the pinout. If your knowledge allows, you can make a special button to turn on the power supply.
Unclear computer power problems: PC stopped turning on

First, let's check the presence of a primary power supply ~ 220V at the input of the PSU. Among the reasons for the absence can be called a malfunction of the power filter, sockets, plugs, cable breakage. Also, the problem may lie in the source. On the back of many units there is a power switch - it can also be faulty or turned off.
In the case of supplying primary power, even if the computer is turned off, the output of the power supply unit has a voltage of + 5V (if everything is working properly). This can be checked by testing the contacts of the power supply connector with a tester. We are interested in pin 9, which has a purple wire (+ 5VSB).
Often the motherboard has a standby voltage LED. If it is active, both the watchdog and the primary power supply are present.
If the computer still does not turn on, look for other sources of the problem. We will consider the most common reasons below.
1. Open circuit in the power button. To check this, use tweezers to close the contacts responsible for turning on the power on your motherboard, or start the power supply unit outside the system unit (we described in detail above how to turn on the power supply without a computer).

2. A short circuit that occurs at the output of the power supply unit. Try to disconnect all devices from the power supply, and temporarily remove all adapters from the slots. Also, disconnect all USB devices. You can also deactivate the 4-8-pin power connector for the processor Power Connector + 12V.
3. Defective motherboard or power supply unit. If only the motherboard is connected to the power supply unit, but it does not turn on, it is probably the unit itself that is faulty. As for the malfunction of the "motherboard", which leads to the impossibility of turning on the computer's power supply, we note that theoretically this is possible, but in practice it is extremely rare. To test this, turn on without connecting the connector to your motherboard. If the power supply unit turns on, it is the motherboard that is faulty.
It is possible to determine if a power supply unit is out of order or some other component by the following criteria:
- after pressing the power button of the system unit, nothing happens - there is no light and sound indication, the cooling fans do not rotate;
- the computer turns on every other time;
- the operating system does not load or does not load, but after a few seconds the computer turns off, although there is sound and light indication and fans are running;
- increase in temperature in the power supply unit and the system unit.
The power supply can be checked in several ways. We will talk about the sequence of each of the checks below, but for now we will only limit ourselves to short information to understand what we will do.
The essence of the first method is to check the voltage supply and at this stage we perform a rough check - is there voltage or not.
The second way is to check the output voltage, we have already mentioned that the voltage must be strictly within certain limits and deviation in any direction is unacceptable.
The third way is to visually inspect the PSU for the presence of swollen capacitors. For convenience, the algorithm for each of the checks will be presented in the form of step-by-step instructions.
Checking the power supply from the power supply
Step 1
Step 2... Open the side cover of the system unit. Remember, or for convenience, take a picture of how the power is connected to each of the components (motherboard, hard drives, optical drive, etc.) after which they should be disconnected from the power supply unit.

Step 3... Find a paper clip. With a paper clip, we will close the contacts on the power supply, and if it was not at hand, a wire similar to a paper clip in length and diameter will do. After that, the paper clip must be bent in the form of the Latin letter "U".
Step 4... Find the 20/24 pin power connector. This connector is very easy to find - it is a bundle of 20 or 24 wires, respectively, that go from the power supply and were connected to the PC motherboard.

Step 5... Find the green and black wire connectors on the connector. A paper clip must be inserted into the connectors to which these wires are connected. The paper clip must be securely fixed and make contact with the appropriate connectors.

Step 6
Step 7... Power supply fan performance check. If the device is working and conducts current, then the fan located in the power supply case should rotate when voltage is applied.
If the fan does not rotate, check the contact of the paper clip with the green and black connectors of the 20/24 pin connector.
As mentioned above, this check does not guarantee that the device is working. This test allows you to determine that the power supply is turning on. For a more accurate diagnosis, the following test should be performed.
Checking the correct operation of the power supply
Step 1... Turn off computer. It must be remembered that the power supply unit of the computer operates with a voltage dangerous to humans - 220V. Therefore, we strongly recommend that you turn off the computer before following all the other points of the instructions.
Step 2... Open the side cover of the system unit. Remember, or for convenience, take a picture of how the power is connected to each of the components (motherboard, hard drives, optical drive, etc.) after which they should be disconnected from the power supply unit.
Step 3... Find the 20/24 pin power connector. This connector is very easy to find due to its larger size - it is a bundle of 20 or 24 wires, respectively, that go from the power supply and were connected to the PC motherboard.
Step 4... Find the connectors for the black, red, yellow, pink wires on the 20/24 pin connector.
Step 5... Carry out the load of the PSU. In the future, we will measure the output voltage of the power supply. In normal mode, the PSU operates under load, supplying power to the motherboard, hard drives, optical drives, and fans.
Measuring the output voltage of a PSU that is not under load can lead to a rather high error.
Note! The load can be an external 12V fan, an optical drive or an old hard disk drive, or combinations of these devices.
Step 6... Switch on the power supply. We supply power to the PSU (do not forget to turn on the power button on the PSU itself, if it was turned off in Step 1).
Step 7... Take a voltmeter and measure the output voltage of the PSU. The output voltage of the PSU will be measured on the pairs of wires specified in Step 3. The reference voltage value for the black and pink wires is 3.3V, black and red - 5V, black and yellow - 12V.

The specified values \u200b\u200bare allowed to deviate by ± 5%. So the voltage is:
- 3.3V should be within 3.14 - 3.47V;
- 5V should be within 4.75 - 5.25V;
- 2V should be between 11.4 - 12.6V.
Visual inspection of the power supply
Step 1... Turn off computer. It must be remembered that the power supply unit of the computer operates with a voltage dangerous to humans - 220V. Therefore, we strongly recommend that you turn off the computer before following all the other points of the instructions.
Step 2... Open the side cover of the system unit. Remember, or for convenience, take a picture of how the power is connected to each of the components (motherboard, hard drives, optical drive, etc.) and then they should be disconnected from the power supply.
Step 3... Disconnect the power supply unit from the system unit. To do this, you need to unscrew the 4 screws that secure the PSU to the system unit.

Step 4... Disassemble the PSU. To do this, you also need to unscrew the 4 screws that connect the 2 power supply covers, after which they must be disconnected.

Step 5... Perform a visual inspection of the power supply. The power supply unit should not have swollen capacitors, dust, and the fan should have free running.
If there is dust in the middle of the PSU, it must be collected with a vacuum cleaner, the swollen capacitors must be soldered to new ones of the same rating, and the fan must be lubricated or a new one must be installed.

If none of the above methods helped to solve the problem, we recommend taking the power supply for diagnostics or purchasing a new one.
Computer power supplies are powered by their connection to the motherboard. However, in some situations this is not possible. Sometimes users need to check the performance of an old or new PSU without using a computer, connect a second unit to a PC, or diagnose a problem. In today's article, you will learn how to turn on a power supply without a computer using a jumper.
To fully understand the issue, do not skip this video. It describes and shows all the actions from the instructions.
The repair and management of computer components must be approached as responsibly as possible. If you do not have practice in such procedures, then follow all the steps from our guide in strict sequence:
- If the power supply is installed in the computer, it must be disconnected and removed. To do this, completely disconnect the system unit from the network, disconnect the 20-pin or 24-pin cable from the motherboard, as well as all additional equipment (hard drives, video cards, coolers, and so on).
- Prepare for the connection equipment that will load the power supply. This role can be played by a hard drive, DVD drive, cooler, or even an ordinary light bulb. The main thing is that the device is in good working order.
- You will also need a short wire to bridge the contacts. A piece of cable with bare ends or an ordinary paper clip bent in the desired shape is suitable as a blank.
In modern personal computers, ATX blocks are used. They connect to the motherboard using a 20 or 24 pin plug, depending on the specific model and manufacturer. The essence of the jumper of the two pins is to simulate the signal from the motherboard. As a result, the power supply will start without third-party equipment. Below are the pin layouts and their colors. To make it easier for the user to navigate, the figure shows the latch of the plug.
Now we turn to the most important thing - the procedure for turning on the power supply. But before that, you need to understand in detail the structure of the power plug and contacts. To close, connect the PS_ON contact, which is marked with a green cable, with any black COM contact with the prepared wire. It is more convenient to jumper PS_ON with an adjacent contact.
If the colors are mixed up on your power supply, then do not risk it and be guided by the location of the necessary wires. If the latch of the plug is considered to be the upper part, then PS_ON is located in top row fourth from the left. The fifth is the black COM, which is connected by wiring.
If you want to run an old AT power supply, this circuit will not work. You need to use two jumpers at the same time. One connects the blue and one of the black pins, and the other is used to bridge between the white and brown wires.
Before turning on the power supply, you must secure against possible damage. The fact is that most modern power supply units refuse to start "idle". It requires a minimum load to power on, so you must plug in a cooler, hard drive, or floppy drive. Connect your device via Molex.
Now everything is ready to start up and test the power supply. It is necessary to connect the equipment to a source of electricity using a regular network cable that is used in the operation of the system unit.
Start the power switch on the back of the PSU. If you have connected a cooler, then it should work with fully operational equipment. If the power supply starts up without additional load, it will reduce the life of the device.
Conclusion
So, now you know how to turn on the power supply without a computer using jumpers. There is nothing difficult in this procedure, so in an emergency you can carry out a simple equipment diagnosis. If you do not understand any points and steps from the instructions, then write questions in the comments. We quickly find solutions to problems and respond to every visitor!


")
- Million people Multiples and submultiples
- Toddler Baked Potatoes
- Potatoes in the oven for a baby 1 year old
- Human chest anatomy
- Than to consider gossips to work, it is not better for yourself, godfather, to turn
- Why are you shy and why do you need it?
- Sour cream with cookie dough
- How to make an omelette for a child: a step-by-step recipe Steam omelette for a child 1 year old recipe
- What happens if you don't eat for a long time?
- How to cook a vegetable salad for a child: simple recipes
- Folic acid dosage: learning to take it right!
- How many liters of water should you drink per day?
- All Quests, tasks for the game housewives!
- The body can synthesize glucose
- Lose weight without harm to health after 55 years
- Womanizer behavior men psychology
- Anatomy and possible damage to the tibia and fibula
- Skeleton of the free part of the lower limb
- Hernioplasty of an umbilical hernia: types, possible contraindications, preparation for surgery, recovery period, reviews
- Cooking a delicious and delicate cream from boiled condensed milk