Tree made of cones (master class). How to make a tree from cones How to make a topiary from cones
Every year in all kindergartens and schools they ask to make products with their own hands. This is perhaps the most common puzzle for parents.
And you know, it's not even bad at all.

We have a lot of natural material, we need to add a little imagination.

Well, most importantly, you and your whole family will immerse yourself in the charming world of creativity.

Today, we will look at a natural resource - pine cones.
It is used not only in school crafts, but also for interior design, Hand-Made designers and others.

Below are photos and a detailed diagram of several crafts made from pine cones.

What crafts from pine cones can you make with your own hands?
Almost everyone can make a craft from real pine and spruce cones, the main thing is desire and a little imagination.

Using this amazing natural resource you can do:
- Decorative elements that will bring the stunning smell of the forest and a cozy atmosphere to your home.
- New Year's crafts: festive wreath, candlestick, Christmas tree, garland, New Year's ball and much more.
- Interesting crafts of funny animals with children.
Festive wreath
You can convey the New Year's mood to your guests right from the doorstep. To design the New Year's wreath we will use:
- Cardboard
- Spruce or pine branches
- Cones
- Satin ribbon
- Not real snow
- Dye
- Glue gun
- Decorations for decoration, optional.

Many materials are used to make the base.

For example: plastic, cardboard, branches, bending wire, and even newspapers.

We settled on cardboard; it is quite simple and convenient to work with.

On cardboard we cut out the diameter of the circle that we need. Next, we attach the branches and cones, forming a symmetrical circle.

After the cones are glued, we continue to decorate our wreath. Take a can of artificial snow and spray the edges of the cones.
If you couldn't find snow, you can paint the scales with white or silver paint.

We tie it with a satin ribbon, choose the color yourself.
Note!


For a more interesting and rich wreath, you can add additional decorative elements: red beads, acorns, nuts, flowers.

Use your imagination and you will succeed!

New Year's garland
A quick and easy craft to make.
Material you will need:
- bumps
- glue gun
- rope
- dye
- glitter

Step-by-step instructions for the craft:
- We prepare the cones in advance and paint them with paint. The paint can be chosen in different colors. Or make it in one color that matches your interior design. You can also use glitter to make the product more elegant.
- We take a rope and mark the distance between the cones.
- We leave 10-15 cm from the edges so that there is room to attach the garland.
- Using a glue gun, attach the pine cones to the rope. Glue along the entire length.
- We are waiting for the glue to dry. And Voila! The New Year's garland is ready.

Note!

For kids and schoolchildren it will be easy to make crafts from pine cones and plasticine of funny animals: Teddy Bear, Hedgehog, Squirrel, Owl, etc.

Mishutka
We will use:
- Cones of different types (pine, spruce, open, closed)
- Scissors
- Plasticine

Step-by-step instructions for making crafts:
Body. From the collected material, select an elongated pine cone. Apply glue to the connecting parts of the scales. We connect the parts so that the scales secure each other.

Paws. We choose 2 larger cones for the lower paws, and 2 smaller ones for the upper paws. Glue the parts to the body, pay attention to symmetry.

Head. We make the head from open pine cones. They perfectly convey the fluffiness of a bear's fur. We attach it to the base with glue.
Note!


Ears, eyes and nose. You can make it from plasticine, and the tip of the nose, for example, from black peppercorns.

If you want to surprise everyone around you, then you can make a big bear. You choose the size of the bear, the main thing is to collect the required number of cones.

You can make the base - the frame of Mishutka - from polyurethane foam, polystyrene foam or papier-mâché. An excellent solution for the stability of the product would be to attach something heavy to the bottom.

We cover the frame with pine cones, and make the ears and muzzle from plasticine or pom-poms.

Hedgehog
The simplest children's craft made from pine cones. To make it you need only two materials:
- Cones
- Plasticine

Step by step description:
Body. The cone itself is well suited for the base of the craft. If you look closely and rotate the scales correctly, they look like hedgehog needles.

Muzzle. Here we will need some plasticine. We make an oblong muzzle from it. And fix it on the craft.

Eyes, nose, paws, ears. We also use plasticine, only in a different color.

As you can see, there is nothing complicated, this craft from pine cones is suitable for kindergarten.

Experiment! Decorate your home with interesting design solutions that you have prepared yourself. Don’t forget about the children, they will also be interested in taking part in the creation of a small miracle.

Photos of crafts made from pine cones


What do you associate with crafts made from pine cones? For the older generation, most likely, it will be school times and the insanely popular “cone men”. However, cones can be used not only for wonderful people who have already become something ordinary. For example, you can make a topiary (or as it is otherwise called, “the tree of happiness”). It is perfect for those who do not like to care for house plants, and they, in turn, pay in return. Moreover, topiary is an excellent craft for a school competition or just a good way to have fun, spend time together and usefully. Just look what beautiful trees you can make with a little imagination and patience!


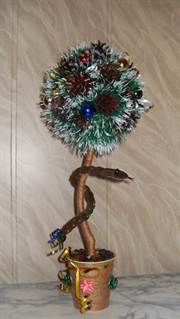
And now we present to you a master class on making topiary from cones and acorns, which can serve as both a decor for your apartment and an unusual gift for friends and family!
We will make such a wonderful and even, one might say, fluffy tree.

Materials for work
1. Pine cones;
2. Thermal gun;
3. Hot melt adhesive;
4. Newspaper (you can use plastic balls, but making a hole in them for the topiary trunk is very inconvenient);
5. Plaster (or alabaster);
7. Pine branch;
8. Paint;
Topiary from pine cones: master class
1. Form a ball from newsprint.

2. Wrap the ball with thread so that it retains its ball shape.

3. Apply glue to the pine cone.

4. Glue the cones onto the ball as close to each other as possible.

5. Form the pine cones into a round shape.

6. Let's sharpen the pine branch.

7. Let's make a hole in the bottom of the ball.

8. Insert a pine branch into the hole and fix it with glue.

9. Paint the ball with silver paint.

10. We spread plaster (or alabaster) in the flowerpot, leaving 4 cm from the edge of the flowerpot. The consistency should resemble sour cream.

11. Insert the barrel with the crown into the solution and fix it until it dries completely.

12. Decorate the base of the topiary with small cones, as in the photo.

13. Final chord - coat the product with varnish.

Topiary made from pine cones, acorns and/or chestnuts is an eco-decor that is especially good for autumn or winter interior decoration or a dining table. We have prepared 2 step-by-step master classes on making decorative trees with your own hands, as well as a selection of photo ideas and video tutorials.
A reminder of basic materials for beginners
Topiary consists of: crown, trunk and base in a pot. Everything is clear with the crown - we will make it from cones, acorns and/or chestnuts. What can be used as its basis? Most often, foam balls (sold in art or office supply stores) or floral foam balls (sold in flower shops) are used for this purpose.
You can use any stick as a trunk: a strong branch (previously dried), a simple pencil, a knitting needle or a wooden stick. If you don’t like the original look of the trunk, then you can wrap it with ribbons, twine, or simply paint or tint it. Finding a cute pot won't be difficult. In fact, an ordinary clay pot is best suited for a topiary of chestnuts, pine cones and acorns. If desired, it can be painted or artificially aged.
As for the base that will hold the tree trunk, here you can choose any mounting mixture (cement-sand mortar, putty, plaster or alabaster) or the same floral foam/foam. If you prefer the first option, we recommend using alabaster. It is available, easy to spread and does not crack. And here are the instructions for its use:
- To fill 1 pot with alabaster you will need about 1 kg of mixture and about 3 cups of water. Stir the solution for a couple of minutes. Once the mixture has thickened to the consistency of thick sour cream, pour it into the pot, set the barrel and hold it level for 2-3 minutes. Leave the mixture to dry for 12-24 hours.
Master class 1. Round topiary from pine cones and more
Since topiary is made approximately according to the same principle, you can use our instructions to create topiary not only from pine cones, but also from chestnuts and acorns.
What you will need:
- Flower pot;
- Base ball;
- Some kind of mounting mixture or polystyrene foam/flower foam for attaching the trunk to the pot;
- Pins with tips;
- Cones, chestnuts and/or acorns;
- Hot glue gun;
- Dry moss (can be replaced with sisal fiber);
- Wooden stick (can be replaced with a pencil);
- Ribbon (optional).
Master Class:
Step 1. First we need to prepare natural materials for work.
- Freshly picked buds should be rinsed in water and then dried in the oven at 350 degrees for 10-15 minutes.
- Acorns and chestnuts simply need to be rinsed and dried naturally. The main thing is to conduct a thorough inspection of them for the presence of cracks, which are dangerous because insects can live in them. Small bugs and worms can eventually move into other fruits.
Step 2. Cut the wooden stick to approximately 45 cm (the height of the trunk may be different depending on the height of the pot, the diameter of the ball and your wishes for the height of the product). If necessary, paint the barrel.
Step 3. Insert the barrel into the ball and secure the attachment point with glue. If you are working with foam plastic, then you need to first cut a hole in it using a knife and scissors.
Step 4. Paint the ball dark brown so that the gaps in the crown of the finished product are hardly noticeable.
Step 5. Dilute your mounting mixture according to the manufacturer’s instructions or dilute alabaster according to our instructions (see). Fill the pot with the mixture, not reaching 2-2.5 cm from the top edge of the pot. In this project, instead of a mixture, we used diced floral foam.

Step 6. Insert the stem into the center of the pot. If you are using any kind of mounting mixture, then the barrel must be inserted immediately after mixing it and held until the mass in the pot hardens.

Step 7. Heat up your glue gun and glue the pine cones/acorns/chestnuts onto the tips of the pins as shown in the photo below. Before you start decorating the tree crown, it is advisable to divide your materials into three groups - large, medium and small.


In fact, it is not necessary to use pins to attach the pine cones/chestnuts/acorns to the base, because you can simply glue them. However, it is with the help of pins that it is easiest to create a neat round crown.
- By the way, fresh and soft acorns and chestnuts can be attached to toothpicks. If your fruits have already hardened, try soaking them in water for a while.
Step 8. Now it’s time for the most interesting part – decorating the tree crown. Our task is to insert pins into the base ball so that the cones/acorns/chestnuts are located as close to each other as possible and at the same time evenly, so that the crown turns out to be round. If the cones have different sizes, then first you need to glue the large cones onto the ball, then the medium ones and only then the small ones. If the material is approximately the same size, then they can be glued in rows according to the honeycomb principle.

Step 9: Cover the "soil" in the pot with dry moss (see photo below) or whatever material you have available and use hot glue to hold it in place.

Step 10: You can add decorations to the topiary, such as a ribbon tied around the trunk.

In the next selection of photos we present other ideas for designing autumn and winter topiaries made from natural materials.


Topiary with a crown of fir cones on a candlestick

This topiary does not have a trunk, and its crown is formed only by halves of cones, namely the tops. Take note of this idea if you want the crown of your tree to have no gaps at all.

New Year's topiary made of cones, ribbons and artificial leaves and holly berries

Topiary made of pine cones and leaves

And here are the trees with a crown of chestnuts. The peculiarity of working with them is that it is necessary to glue additional decor between the fruits to close the gaps. For example, these could be rowan berries, sisal or small cones. Also keep in mind that due to the heaviness of chestnuts, it is advisable to both glue them and pin them.


By the way, chestnuts can be used not only for crown decoration. Below are photo examples of living topiary with chestnuts in a pot.

Now we invite you to watch a video on how to make topiary from cones, chestnuts and acorns with your own hands.
Master class 2. Christmas tree made of cones
In addition to the traditional round topiary from cones, chestnuts and acorns, you can make a Christmas tree topiary. You can place such a New Year's decoration on the holiday table, on the mantelpiece or at the entrance to the house.

Here's what you need:
- Pine cones come in different sizes, from large to small.
- The base is in the shape of a cone made of polystyrene foam or floral foam. If you don’t have a ready-made base, then you can make it yourself from paper, newspaper lumps and cardboard.
- Hot glue gun.
- PVA glue.
- Dark brown acrylic paint or brown paper.
- Glitter (optional).
- Brush.
Master Class:
Step 1. Skip this step if you have a ready-made tree base. If there is no base, then we suggest making it yourself. Roll a piece of paper (eg A3 size) into a cone of the desired size. Secure the cone with tape and cut off the excess paper at the base and top (that's where the cone will sit). Now “stuff” the workpiece tightly with balls of crumpled sheets of newspaper.

Next, cut out a circle from cardboard, the diameter of which is 2-3 cm larger than the diameter of the base of the resulting cone. Glue the cone onto the circle using tape as shown in the following photo. Woo-ala! The basis for winter topiary is ready.

Step 2. To disguise the original color of the base, you can paint it with dark brown paint or simply wrap it in brown paper, such as kraft paper.
Step 3. Once the paint on the cone is dry or it is completely wrapped in paper, start gluing the cones. First glue the first row of the largest pine cones to the bottom of the base.

DIY pine cone tree
We invite you to make a beautiful and unusual New Year tree from pine cones. In floristry, an artificial tree is usually called topiary, which is relevant and popular. Such a “Christmas tree” will take up little space, and it can be made from the simplest materials.
To create a tree from cones you will need:
Pine cones + Christmas tree decorations (beads, toys, balls, tinsel)
Several sheets of newspaper for the base,
- padding polyester,
- sewing threads,
- glue gun/glue "Moment-Crystal",
- sisal (can be purchased at florist shops, used to decorate bouquets)
- building gypsum/cement
- a stick for the trunk (can be made from wire and thread/found in a park or forest)
- flower pot/large yogurt cup + fabric for covering
- ribbons, cords for decorating a glass
Cone tree step by step:
First of all, we will make the base for the tree, for which we take newspaper sheets and crumple them to make them soft (Fig. 2). Then crumple the newspaper sheet into a ball, which needs to be wrapped in another 1-2 sheets of newspaper (Figure 3). The base ball should be quite tight. Also, instead of newspaper, you can use ready-made plastic or foam balls (pick flowers or paint).

To fix the shape, the ball must be wrapped with threads (Fig. 4). After that, the ball will need to be covered with padding polyester and glued to it - this way, toys and cones will be more reliably glued to the ball.
Start gluing cones on the surface of the ball, first mark a place for the trunk (Fig. 6). If there are not enough pine cones, you can also add Christmas tree decorations, nuts, and artificial fruits (Fig. 7).

Take scissors and use them to make a hole in the ball for the barrel, insert a stick and fix it with glue. The shelf can be pre-painted in silver or gold, and also braided with threads.
Take a plastic flower pot or yogurt cup and drape it with fabric and decorate it however you like.
Next, add gypsum to the prepared pot (approximately 3/4 of the volume of a glass), dilute with water to the consistency of sour cream. Immediately insert the tree trunk and hold it for a couple of minutes until the plaster sets.
All that remains is to decorate the finished tree from cones. Why take sisal fibers and fill the gaps between the cones with it (Fig. 8). Glue beads (Fig. 10), garland and other decor at your discretion.

The pine cone tree is ready!
When creating your tree, do not forget that nuts and cones are a symbol of prosperity and abundance. Happy Holidays!
The art of creating decor with your own hands attracts many needlewomen. Everyone wants to create something original and amazing that they can be proud of. Topiary is one of my favorite crafts, as it is a universal thing. It is made from a variety of available materials or specially purchased material is used to create chic decoration elements for the home, summer cottage, or as a gift to loved ones, friends, and colleagues. This is a great idea for spending time with children, teaching them something new, training hand motor skills, cultivating a child’s creative taste and love of work. Some natural components that nature itself gives us may be appropriate material for topiary. Real flowers, leaves, everything that grows on trees, rowan berries, acorns, nuts, cones. This article will describe how to make topiary from pine cones step by step. Step-by-step instructions with photos will help you clearly see this process.


Original eco-wood
Let's give a short guide on how to make topiary from cones with your own hands using one of the examples.
Cones are collected in the forest or in the park under the spruce trees. If you collect closed cones, they have one peculiarity - when warm, they open with a bang.
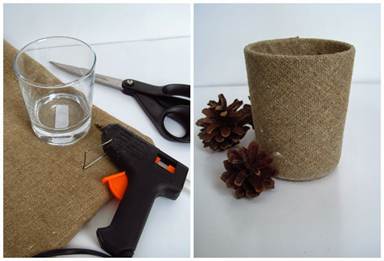
We will need cones, a plastic ball for a children's pool, paint, preferably brown acrylic, a glass, a stick for the barrel, plaster, PVA glue, a hot glue gun, burlap, beads and ribbons for decoration, scissors, a brush.

Let's get to work.
Stage 1. We make a hole in the ball for the stick, process the edges with a glue gun and insert the stick. The glue dries quickly. We cover the ball with pieces of newspaper using PVA glue so that we can easily paint it. Cover the barrel and ball with paint and wait for it to dry.

Stage 2. Glue the cones one by one onto the ball using glue from a hot-melt gun. The process of creating a crown is simple. So we move on to our potty. We cut out a piece of burlap so that it disguises the walls from the outside and, lowering it a little inside the glass, seal it with hot glue, insert the crown with the trunk into our resulting pot and fill it with gypsum solution. We are waiting for it to harden.


Stage 3. The topiary as a whole is ready, now all that remains is to decorate it with beads and ribbons. Pour PVA glue into a glass and decorate with a mound of bright beads; using a heat gun, you can also decorate the crown of the tree, between the cones.
We tie a ribbon with a bow to the pot and also add beads. This topiary looks very aesthetically pleasing and amazingly beautiful; you can use it to decorate your home during the New Year holidays.


Forest wonders
Forest materials are arranged very beautifully among themselves. You can decorate pots with small twigs, like a small fence, and acorns instead of beads. Small master classes on topiary from cones and acorns of various variations.
1) Cones, rowan berries and juniper branches, a straight stick for the trunk, acorns, moss.
The basics we have are a foam ball and a mayonnaise bucket, plaster and glue. Small branches are collected in a fence. We line the bucket with it. Glue the acorns on top with hot glue. We attach all our natural ingredients with glue or insert them into a foam ball. We attach the ball to the trunk and send it to the pot. Pour the gypsum mixture and wait for it to harden, then put the moss in the pot and plant acorns on the glue.


2) Cones, acorns, chestnuts, nuts can be coated with paint, and tree berries can be coated with transparent varnish.
The shelf life of such topiary will be extended, the appearance is not so natural, but in some interiors, in modern design styles, it is sometimes appropriate to use imitations of living nature.


3) Topiary made from forest materials can be combined with spices; such trees retain their aroma and I feel nature next to them. It will create a very warm atmosphere not only in the kitchen at home, but also in restaurants and cafes. This is an excellent gift for lovers of nature and environmentally friendly materials, complemented with natural fabrics in confirmation of pure intentions.


- Master class “Kite” What is a kite made of
- Simple and original ideas for those who don’t know how to make a bird feeder with their own hands from scrap materials How to decorate a bird feeder from a box
- Molds made from epoxy and scrap materials
- DIY treehouse DIY treehouse for kids
- Surviving in winter without a tent How to make a cave from a tunnel
- We make templates for roses from foamiran on our own
- A vase made of newspaper tubes and a topiary made from natural material “autumn colors” Preparation of the necessary materials
- Electric motor soft start device
- Installing knives on an electric planer
- Practical wood carving tips for beginners
- Design of a sauna stove - types and design features Round sauna stove
- Why do you dream about the funeral of an already deceased father?
- Examples of words with dividing soft b and hard b signs?
- Stages of the historical evolution of the organ point
- Military-industrial complex of Russia: industries, enterprises, problems
- Reiki triangle - wish fulfillment
- Amulet dolls - their types, history and rules of creation. What are the different types of amulets?
- Mantras for love and happy marriage Mantras for marriage and personal life
- Where can I get runes for fortune telling?
- We make firewood sheds and woodpiles with our own hands