Is it possible to drive a nail into concrete? Nails for concrete without drilling. Driving nails into drywall
It would seem that what could be easier than hammering a nail? If we are talking about a wooden surface, even a teenager can handle it. But furnishing an apartment with concrete or brick walls is a completely different matter. An inexperienced craftsman takes up a hammer and finds that he is unable to do anything. You shouldn’t give up; if you want, you can overcome any obstacles. You will learn how to hammer a nail into a concrete wall from this article.
Deciding on the sizes
I want to decorate the walls of any home. Pictures, lamps, shelves - you never know what needs to be attached, and in such a way that at the slightest draft it does not fall on someone’s head. Before you drive a nail into a concrete wall, you need to decide on the size of what you will hang your shelf or picture on. However, you should do the same if you are dealing with any other material:
- Measure the thickness of the surface you will be nailing.
- Divide it by 4 - this will be the cross-section of your nail.
Important! You can take a nail of a smaller cross-section if the object is light, but you shouldn’t take a larger one, the board may simply fall apart.
We measure the length
At the hardware store you will find dozens of types of nails - all possible sizes, from very tiny ones that are used to fasten thin wooden frames to huge ones that can be used to hang a large metal plate. The length of the nail must be taken very carefully. The point should not stick out from the other side of the wall, but at the same time, the length should be sufficient to hold the object that you are fastening in this way.
Determine the length as follows:
- Measure the approximate thickness of the wall you are going to drive the nail into.
- Divide the result by 3 and multiply by 2 - the nail should go into the wall two-thirds of its thickness.
- Add to this number the thickness of the item you are going to hang.
What else will you need?
What else should you think about before hammering a nail into the wall? Of course, about the tools. You need:
- hammer;
- drill with a drill bit for concrete;
- small diameter drills;
- pliers;
- pencil or marker.
You may also need a level and a tape measure (or a folding meter), but this depends on what exactly you are going to attach. Of course, there are ways to drive a nail without a drill (for example, into a wooden partition), so this tool is not always needed.
As for the hammer, of course, you can’t do without it. And you need to choose it carefully:
- the handle should be comfortable;
- The head should fit tightly and not jump off.

Hammer sizes
It is very useful to have several hammers of different sizes on the farm:
- MST-1. The small MST-1 hammer is suitable if you need to connect two wooden boards and the length of the rod does not exceed 4 cm. It weighs approximately 250 g, has a relatively small and comfortable handle - 25-28 cm, and a working surface - 9 cm.
- MST-2. The MST-2 hammer with a handle length of 30-32 cm and a working surface of 11 cm is convenient for driving in medium-sized nails. It weighs approximately 500g. It is almost universal, so if you want to have only one hammer, it is best to choose this one.
- MST-3. MCT-3 is quite heavy, weighing 1000g or so. They are inconvenient to drive small nails into. It has a large working surface of 13 cm and a long handle of 35-37 cm.
If you can hammer a nail without a drill
You can hammer a nail into a wooden wall in the most ordinary way. But, if you have never done this, you will immediately discover that this seemingly simple work has its own subtleties. First of all, the question arises: how to place a nail and how to hold it so as not to hit your hand with a hammer? So knowing some subtleties will not be superfluous:
- Mark the location where you are going to drive the nail.
- Take the nail by the middle of the shaft - you need to take it in your left hand (if, of course, you are right-handed), with your thumb and index finger.
- Place the point at the intended location.
- Place the rod perpendicular to the plane (although there are exceptions when they are driven in obliquely).
- Take the hammer in your right hand (a left-handed person, of course, will do everything the other way around).
- Apply 2-3 confident blows - they may not be particularly strong, but should accurately hit the cap.
- The nail should penetrate the surface by about a fifth of its length, sometimes this is enough.
- If the rod needs to be driven in deeper, apply a few more blows so that only the head or a small piece of the rod remains outside (if something needs to be hung, and not nailed tightly).
Important! Please note that your not entirely confident actions may cause the rod to bend. This is extremely inconvenient, and the question always arises of what to do in this case. You can, of course, straighten the nail and try to hammer it in again, but don’t be surprised if it bends again in the same place, or even breaks. Unfortunately, high-quality metal is not always used to make fasteners, which causes similar problems. There is another way out - drive the nail in as it is, that is, in a bent form. But this method is not always suitable.
Trouble with a tree
There are times when the wood seems to be soft, but it is not possible to break through it, and it is not a matter of the force of the blows. Most likely, you did not quite correctly determine the location and the tip got into the seal. There are two ways to deal with this situation:
- Pull out the tip and drive it in nearby.
- Pull out the nail, make a small hole with a thin drill at the same mark and insert the tip into it, and the diameter of the hole should be less than the cross-section of the nail.
Important! The more accurate the blows and the less the tip moves during the process, the stronger the connection will be.

We hammer from the end
The end of any board is a vulnerable place. Sometimes you have to hammer nails in there too, but there is a fairly high risk that the product will split. The fibers in this place are easily torn. But you can make them diverge, and then the connection will be stronger. The smartest thing to do to drive a nail into a wall is as follows:
- Grind down the tip a little to dull it - a regular file is suitable for this.
- Mark a place for the hole at the end.
- Drill a small hole at the mark - the drill should be thinner than the rod.
- Drive in a nail.
If you want to firmly connect wooden surfaces, consider a few more points:
- If you lubricate the tip with soap, the risk of splitting the board is reduced.
- There should be gaps between adjacent nails; you cannot drive too many nearby - this reduces the strength of the board.
- If the surfaces are thick and the nails are large, it is best to grip the fasteners with pliers.
- It is convenient to attach various objects to the plaster using a punch.
- To pierce a wall covered with wallpaper, paper or non-woven fabric is cut with a cross, the corners are opened, a nail is driven into the hole, and then, if necessary, the edges are glued.
Concrete wall
With wood everything is clear, it is a soft material, so additional devices are rarely needed. Is it possible to hammer a nail into a concrete wall? Nothing is impossible, but you have to try. First, try doing this with a drill. Mark the place where you will drive in with a hammer or center punch. As for how to drive a nail into a concrete wall without a drill, everything is a little more complicated - you still have to make a hole for the dowel with something:
- Take a drill of a suitable diameter (you will find it on the marking), the dowel should be the same size.
- Drill a hole.
- Remove dust (a household vacuum cleaner will do).
- Insert the dowel.
- Immerse its cartridge to the desired depth.
- Drive in a nail.
If there is no drill
A drill is a very useful thing in the household, but a novice master may not have one. In this situation, a bolt will help out - a metal tube, one end of which is hardened and sharpened with teeth:
- Mark a spot on the wall.
- Place the sharpened end of the bolt on the mark.
- Hit it hard with a hammer - it's better to use a heavier tool.
- Turn the bolt slightly and hit again.
- Proceed in this way until you get a hole of the desired depth.
- Remove dust periodically.
- Drive a wooden plug into the hole.
- Drive a nail into the cork.

How to make a chopik?
The question arises, what is the wooden plug that is inserted into the hole? It's done like this:
- Cut out a block of wood according to the size of the hole - the harder and denser the wood, the more reliable the connection will be.
- Give it the shape of a cone - the narrow end should fit into the hole freely, and the wide end with difficulty, that is, its diameter should be a little larger (about 3 mm).
- Make a cut at the narrow end.
- Insert a wedge from the same breed into the cut.
Important! The wood must be dry.
Screws
Some items are attached to concrete walls with screws. They also need holes. You can also insert them into wooden plugs. But there is another way - the holes are filled with alabaster or cement, and wire is wound onto the screw threads.
Brick wall
Brick is softer than concrete, but harder than wood; this material has its own characteristics that must be taken into account if you want to hang something on the wall:
- Choose a place - this must be approached carefully, since the bricks are attached to mortar, which can spill out from strong impacts. It is best if the nail goes into the middle of the brick.
- Carefully drill the holes - start at a slow speed, and then increase the speed when the drill reaches a depth of 1 cm.
- Carefully remove crumbs and dust from the hole - brick crumbles much better than concrete.
Fortunately, the times when fastening any product or coating to concrete was a real problem are long gone.
Instructions answering the question of how to hammer a nail into a concrete wall used to consist of actions such as:
- Drilling a hole in concrete, for which diamond drilling of holes in concrete was used;
- Hammering a wooden plug into this very hole;
- The fastening element was just being hammered or screwed into the plug.
Today, to produce such fasteners, specialized nails, dowels, and even liquid nails for concrete can be used.
Mounting nail for concrete fasteners
Mounting nails for concrete are a fastening element that is used to connect various structures, as well as to fasten any products or coatings to a fairly dense and solid base, which can be brick, stone and various types of concrete ().
The main purpose of products such as nails for aerated concrete, plain concrete, brick or stone is the installation of heavy structures of large dimensions. Such fasteners can be used to fasten heavy metal structures constructed as part of large-scale construction of residential facilities and industrial buildings.
The material for the manufacture of such products is durable hardened steel. To begin the installation process using this fastener, a special washer is placed on the rod, which will allow it to be centered.
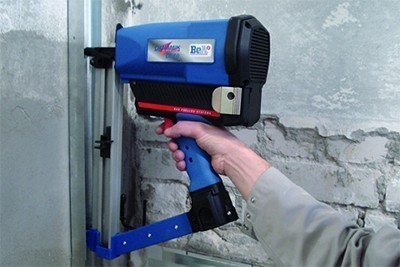
In order for such a nail to be driven into a concrete base, a specialized gas nailing gun for concrete must be used.
Note! If you need to drive a nail into a brick or other fairly soft base, there is no need to use a gun; you can drive it into a surface of such density with a hammer.
The basic principle and reason for the reliability of such fastening is the most common friction force, which holds the nail at the base.
The main advantages and benefits of nails for concrete fasteners

Such elements have the following important advantages:
- Reducing parameters such as the price and labor intensity of creating fasteners allows the reliability and high quality of connections created by such fastenings, due to the small penetration depth, which allows the use of cheaper and less powerful pistol cartridges;
- In order for the fasteners to have maximum quality and reliability, they are equipped with specialized ballistic tips;
- To ensure ease of use and maintain the best technical characteristics, such products are produced in the form of a clip;

- To ensure safety and reliability of fastening, a method called the “torsion effect” is used;
- Nails are recognized as the fasteners with the best penetrating abilities;
- Modern versions are equipped with a specialized tip, the entire length of which is notched. This notch allows for maximum productivity and a high level of quality of the fasteners produced;
- These elements are endowed with an increased level of strength, which ensures resistance to bending and the ability to withstand any loads even when installed on particularly hard bases;
- Nails also allow for the installation of metal structures to concrete foundations.
Types of fasteners
Construction nails for concrete fasteners available on the market in the widest range of sizes, types and applications ().
In addition to the usual types of such products, there are also specialized ones designed for facade, roofing and thermal insulation work.
Note! There are also universal nails that can be used in various construction and installation works.
The differences between products of this type are the following:
- Manufacturing can be carried out from materials of various types;
- Different products are intended for different types of work;
- Various elements are designed for installation with a certain load level.
Dowel-nail for concrete fasteners

A concrete dowel nail is another type of fastener used as a base for attaching certain types of screws or anchor bolts. The quality of this product directly affects the reliability of the mount created.
For this reason, you should choose the right type of element depending on the base to which the fastening will be made:
- For working with heavy, durable concrete bases;
- For fastening to light, porous substrates.
The main criterion that distinguishes a dowel nail for concrete of one group from a product from another is its resistance to compression.

The photo shows a clear demonstration of wedging
The main effect of elements of this type lies in their wedging. The blades, which become wedged when the fasteners are driven in, make it impossible to remove the dowel from the wall without violating the integrity of the dowel.

Note! A dowel nail for aerated concrete or concrete reaches the final stage of its fastening and fixation in the surface at the moment when a screw enters the dowel. At this very moment, wedging occurs, which, together with the fixing tendrils (if any), ensures the impossibility of removing the dowel from the base.
Finally

You can purchase nails for working with concrete structures at any hardware store. And anyone can hammer them in with a gas hammer with their own hands without much difficulty (
A huge amount of construction work is associated with fastening to and from the sheathing to the lining. But no less significant is the part that is used for fastening to materials of increased strength and density - and even cast metal.
It is clear that the fastening elements in this case must also be extremely strong. And today we will talk about length and other dimensions for both concrete and metal, their prices, GOST and installation.
An ordinary nail is a construction nail, universal, and when driven into concrete it simply bends. There is nothing to say about metal. A nail is a hardened nail, that is, made of high-carbon steel and heat-treated. This procedure gives the fasteners extremely high strength.
Regular wire nails of all types are made from low carbon steel - Art. 1, Art. 2, Art. 3, Art. 10, Art. 15, cannot be hardened because the alloy contains too little carbon. High-carbon steel for fasteners is used only in the manufacture of custom-made products.
The hardening process boils down to heating the alloy to a certain set temperature, holding it under these conditions and cooling. In this capacity, oil, a solution of caustic soda, ordinary salt, as well as lead, alkali, saltpeter, and so on are used. It is possible to harden without cooling by surface treatment with high frequency currents.
The hardening time depends on the size of the product; for nails, heating and holding are minimal. The hardening temperature is selected in accordance with the steel grade.
The cooling rate also depends on the amount of carbon: the higher its content in the steel, the lower the cooling rate. At the same time, they even monitor the position of objects in the coolant, and not just the time. Thin and long products such as nails are immersed flat, since otherwise the lower parts of the product are compressed first, which leads to severe stress.
Hardened steel has exceptionally high strength but low toughness. This kind of fastener almost does not “work” in bending. Of course, when fastening to metal or concrete there is no need for this, but it is precisely this feature that does not allow it to be used when fastening flexible materials or those that require shifts during operation.
Concrete nails have maximum penetrating power. In a large number of cases, they are produced not for manual work - this is very difficult, but for work using a gas nail gun.
The most modern modifications of the product are equipped with a special ballistic tip. There is a notch along its entire length, which makes it easier to immerse in dense material. A hardened nail with a special washer is used, which allows the fastener to be centered. Strictly speaking, this is no longer a nail, but a dowel.
This video discusses the characteristics and testing of nails for concrete and metal:
Product types
The nail is made from stainless hardened steel, so there is no need for a protective layer. But, since fasteners of this kind are designed for an extremely long service life, in practice products are used both with and without additional coating:
- hardened steel nails– have a matte gray color rather than black and are quite suitable for any interior and exterior work, excluding rooms with very high humidity;
- – the minimum zinc layer is 6 microns. This fastener is used for damp rooms, and even industrial ones;
- – have a beautiful golden color, and, in addition, absolute resistance to moisture and most acids. This option is used in areas where exceptional resistance to corrosion is required: in production workshops, for example, in shipbuilding. This type of fastener has the highest cost.
Since different materials have to be attached to concrete, the shape of the rod of the products can also be different:
- round rod– the classic version most often used in construction work;
- grooved– used for particularly dense materials – heavy concrete;
- flat– for holding non-massive structures;
- square– specialized fasteners.
All varieties are characterized by extreme strength and very high load-bearing capacity.
Read below about the weight and dimensions of nails driven into concrete and metal.
Anchor-nail (dowel-nail) driven in concrete

Weight and dimensions
Nails for metal and brick are most often made to order, so their sizes are regulated not by GOST, but by TU. The table shows the most common parameters of concrete and metal nails for mounting guns.
| Name | Rod diameter, mm | Rod length, mm |
|---|---|---|
| 2,7*16 | 2,7 | 16 |
| 2,7*19 | 2,7 | 19 |
| 2,7*22 | 2,7 | 22 |
| 2,7*25 | 2,7 | 25 |
| 2,7*32 | 2,7 | 32 |
| 2,7*3 | 2,7 | 38 |
| 3,05*16 | 3,05 | 16 |
| 3,05*19 | 3,05 | 19 |
| 3,05*22 | 3,05 | 22 |
| 3,05*25 | 3,05 | 25 |
| 3,05*32 | 3,05 | 32 |
| 3,05*38 | 3,05 | 38 |
| 3,68*50 | 3,68 | 50 |
| 3,68*60 | 3,68 | 60 |
| 3,68*65 | 3,68 | 65 |
Specifications
Specifications for the manufacture of hardened nails are a kind of compilation of requirements for dimensional standards of construction nails and the characteristics of hardened steel. Each variety of the latter is regulated by its own GOST.
The parameters of the construction round nail are described by GOST 4028-63. Its requirements for the product are quite standard.
Do you have a picture that needs hanging? About whether it is worth using for this nails for concrete, and whether it can be done without drilling, this video will tell you:
Installation features and product prices
Nails for metal and concrete are hammered in manually extremely rarely.
- If the base is relatively soft - clay brick, for example, driving is done with a small sledgehammer or hammer weighing more than 1 kg. In this case, it is necessary to observe safety precautions: wear goggles or a protective mask to prevent the ingress of concrete or brick chips.
- If the base is highly dense or when metal work is to be done, it is necessary to use a special tool: gas, pneumatic, powder nailer. Nails for the device are supplied assembled into a clip, and the absence of any muscular effort makes fastening a simple matter.
Nails are most often sold in the form of ready-made clips of 10 pieces, in packs of 1000 pieces. The cost depends on the coverage and size. So, the galvanized version costs from 1230 to 2000 rubles. per package. Brass-plated fasteners for concrete will cost 2955–3599 rubles. per package.
Nails for concrete, despite the highest strength, are specialized fasteners, and besides, their cost is considerable. So it is irrational to use such nails for fastening or lathing.
The video below shows how to harden a screwdriver and nails at home:
In everyday life, we often encounter this problem, especially new residents when moving or during renovations - we need to drive a nail into the wall. While a gypsum block or brick wall can still be easily dealt with, problems arise with a concrete wall. As a rule, no nail will go into concrete. Therefore, based on what item we are going to hang, we act accordingly. We hang a light picture or photograph like this: using a drill, we drill a hole, cut a wooden peg under it and drive a nail into it. But for heavier objects we need to have dowel-nails. We drill a hole, drive in a dowel and then a nail. There is no other way.
For that. To drive a nail into a concrete wall, you first need to prepare a hole. Electric drills with a hammer drill function cope best with this task. When using conventional drills, you need to use a hammer. In Soviet times, they were sold in sets for new residents. In principle, it was possible to knock out a hole in the wall with one hammer, but with an electric drill with a Pobedit or diamond drill it is more accurate. Without a hammer, the drill simply warmed up, sometimes until it glowed orange.
If this is a dowel - a nail, then it can be driven into the wall using a special construction gun. There is no other way to drive a nail into a wall made using factory molding, and this has been verified. Previously, during the times of mass construction, the floors were covered with cartridges from blank “small guns”, just from such construction guns that drive such thick nails into the wall, up to the very head, and also through the part or part being nailed.
But if the wall is homemade, that is, concrete is poured into the wall with your own hands, and has low density and high porosity, then a strong, hardened nail, or better yet, a dowel, can still be driven into the wall. And this, again, has been proven, but here it is necessary to very precisely and strongly hit the head with a small sledgehammer with all its might, and so as not to bend the nail, and so as not to crumble the edges of the hole.
I once saw how they hammer a nail into a concrete wall. You must first drill a hole there using a drill, then make something out of wood in the form of a plug so that it can fit into this hole, then drive a nail in there so that holes and cracks are not visible, you can plaster the place where the nail was driven in. Instead of a nail, you can drive in a dowel.
Driving a nail into wood or drywall is easy, but driving nails into concrete is a different matter. Of course, such a procedure is not performed often, because in most cases, to secure something to a concrete base, we prefer different types of anchors or quick-installation dowels. However, one should not exclude the possibility that one day it will be necessary to use nails with concrete, so we have prepared some tips on how to do this job correctly.
This may seem strange, but the tools used to drive nails into concrete are exactly the same as when working with other materials. Most often, a construction hammer is used, with a head weighing at least a kilogram and a fairly long handle. Using a lighter tool, you are unlikely to achieve success, because in our work we will need a large supply of energy, and a long handle will serve as an excellent lever.
The easiest way to secure a nail in a concrete wall is to use a pneumatic, electric or powder nailer gun. By properly setting up the equipment, you can quickly complete a fairly large amount of work without much effort. Before using a powerful tool, be sure to read the user manual - not all nail driving devices allow you to work with concrete. If the manufacturer allows such use of its product, it is worth clarifying the necessary settings and requirements for fasteners in the passport.
 Needless to say, trying to hammer an ordinary nail into concrete is unlikely to be successful? To work with this dense building material, special nails made from special grades of steel are used. Also, nails for concrete, which are also called dowels, have a special shape - they are thicker than usual, have a massive head and, very often, a notch - longitudinal or spiral. Dowels for construction guns, produced in recent years, can also be equipped with a special ballistic tip, which facilitates the penetration of hardware into the thickness of dense material. Many types of dowel-nails are produced with a washer pressed onto the rod.
Depending on the shape of the working part, nails for driving into concrete and brick can be of the following varieties:
- Grooved - for the heaviest concrete;
- Flat – for fixing parts of small mass;
- Round is the most common classic type;
- Square - used when performing specialized work.
Hardened stainless steel is most often used as a material for dowel-nails, so corrosion is not a problem for such fasteners. Fastening using concrete nails is extremely durable, provided the installation technology is followed. A dowel hammered into a wall can perform its functions without reducing its load-bearing capacity for decades, even in the open air. It should also be mentioned that removing a nail, especially one hammered by mechanization, is a very difficult and time-consuming task. During dismantling, there are often cases of serious damage to the surface around the fastener, therefore, when choosing a place for the dowel, you need to be extremely careful.
It is hardly worth stopping at driving nails using a mechanized method, since this work does not require any special tricks. But if you plan to fix the dowels manually, you need to know a few important nuances:
Hammering dowels into concrete structures is a last resort, which is resorted to in the absence of alternatives. If possible, it is recommended to hammer nails with construction guns or use quick-installation dowels, as well as expansion and chemical anchors installed in holes prepared with a hammer drill.
Useful tips


- Surviving in winter without a tent How to make a cave from a tunnel
- We make templates for roses from foamiran on our own
- A vase made of newspaper tubes and a topiary made from natural material “autumn colors” Preparation of the necessary materials
- Electric motor soft start device
- Installing knives on an electric planer
- Practical wood carving tips for beginners
- Design of a sauna stove - types and design features Round sauna stove
- Photos of small houses and how to build them yourself Stylish small house
- Cold restoration of facade ceramics
- Aluminum casting at home: making molds, technological process Using a stove
- How to carve a monkey from wood with your own hands: photos and ideas for beginners and carving masters
- Reiki triangle - wish fulfillment
- Amulet dolls - their types, history and rules of creation. What are the different types of amulets?
- Mantras for love and happy marriage Mantras for marriage and personal life
- Where can I get runes for fortune telling?
- We make firewood sheds and woodpiles with our own hands
- Master class “Kite” What is a kite made of
- Simple and original ideas for those who don’t know how to make a bird feeder with their own hands from scrap materials How to decorate a bird feeder from a box
- Molds made from epoxy and scrap materials
- DIY treehouse DIY treehouse for kids