DIY small fabric flowers. DIY fabric flowers: master classes. Photos and ideas. Fabric flower leaves
DIY fabric flowers you can use not only as decorations and accessories, but also as a decorative element in your home. Bright tilde bouquets and single flowers in pots will fit perfectly into the interior, which will delight you with their blooms all year round, warm you up and lift your spirits on a gloomy morning. To realize your creative plans, you can use various textiles - satin and silk, cotton fabric with a bright pattern, felt or fleece, from which you can make miniature buds, and even jeans, which allows you to create modern stylish jewelry for young girls.
DIY fabric flowers: master class
They certainly look stylish, but modern girls who prefer a denim look can be offered to create DIY denim flowers, which can become a decorative element of clothing or accessories.
Jeans can be used to decorate hairpins and brooches, headbands and headbands, as a wrist bracelet and a necklace; a finished voluminous decorative flower can be attached to a bag or slippers.
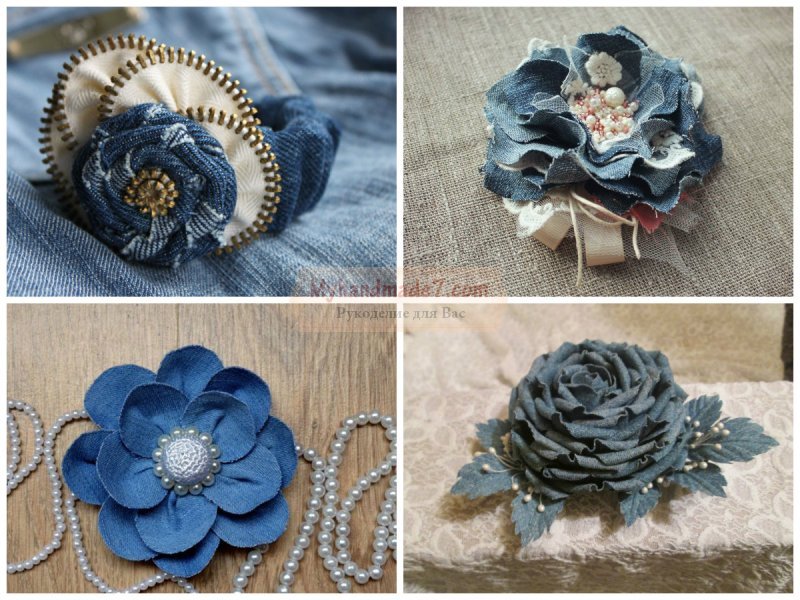
A denim flower can be formed by folding individual petals, or from a long strip of fabric in the form of a spiral. Additional decoration for denim decoration can be linen lace and ribbons. Separate petals can be made using a wide metal zipper, which is used to create the basis for the future accessory. And so that you can easily cope with creating an accessory - DIY fabric flowers, video you can find a step-by-step description and demonstration of the process.
Do you have a free evening and some scraps of satin, chiffon, linen, denim or organza? We invite you to learn how to make fabric flowers with your own hands! By following our master classes, you will master the art of color making, which will give you the opportunity to:
- Wrap gifts beautifully;
- Update interior items, say, lamp shades, curtains or cushion covers;
- Transform clothes, bags, shoes;
- Make accessories for interior decoration, for example, artificial flowers, wall panels, wreaths, topiaries;
- Make hair decorations (hairpins, headbands, etc.);
- Making jewelry: brooches, rings, earrings, necklaces;
- Decorate table settings and arrange any holidays, such as birthdays and even weddings;
- Make presents for the child’s teachers and caregivers;
- Make exclusive gifts for loved ones;
- Design diaries, covers, albums and notebooks.


In addition to step-by-step instructions for beginners, here you will find a selection of photos for inspiration, as well as useful videos.
Master class 1. Simple roses made of fabric in country style
If you like country, Provence, shabby chic or rustic decor, then this master class is for you. Below are examples of the work that you can do after mastering the technique of rolling roses from fabric.

Wreath of roses made of linen, lace and tulle

Spring wreath decorated with fabric roses


You will need:
- Textile;
- Scissors;
- Hot glue gun.
How to make a rose from fabric:
Step 1: Cut the fabric into ribbons. To create one rose you will need one strip 50-70 cm long and about 3-5 cm wide. However, you can choose other sizes if you want to make the rose larger or smaller than in this project.
Step 2: Fold your strip in half and place a 1.5cm bead of glue on the tip (see right photo above).
Step 3. Start rolling the strip into a roll in a few turns.
Step 4. When the roll becomes sufficiently dense and strong, start forming the first “petals”: fold the ribbon diagonally to the outside as shown in the top photo on the right and wrap around the center of the rose.
Step 5. Continue forming the petals in the same order: fold the tape on the bias to the outside - wrap the workpiece - fold the tape on the bias to the outside - wrap the workpiece - etc. There should be approximately 3-5 bends of the ribbon per row of petals. From time to time, layers of fabric need to be fixed with hot glue. As a result, you should end up with a rose similar to the one in these photos.
Experiment with the number of folds of the flower and the density of the folding of the fabric to achieve a more casual or, conversely, more neat look for your flower
Step 6. Once the rose reaches the desired diameter, lower the remaining tail of the ribbon down and glue it to the base.
In this project, the back side of the craft was covered with the remaining tail of fabric.
Step 8. Make the number of flowers you need in different sizes - small, medium and large.
This video presents a master class on how to make roses from denim with your own hands.
Master class 2. Artificial flowers made of satin fabric or organza
Looking at these flowers made of satin fabric, it seems that they were created by a real master of flower making, but in fact, even a beginner can make the same realistic peonies/roses.


You will need:
- Candle;
- Satin, silk, chiffon or organza made from 100% polyester. For making peonies, white and pink fabric (all shades) is suitable;
- Scissors;
- Yellow floss threads (for stamens);
- Needle.

Instructions:
Step 1. Cut out 5 circles from fabric: 4 circles with a diameter of 8-10 cm and 1 circle with a diameter of approximately 5-8 cm. You can cut roughly and by eye, any inaccuracies and unevenness do not matter.

Step 2. Light a candle and start processing the first round workpiece: carefully bring its edge close to the flame and begin to rotate around its axis so that all the edges of the circle are melted and curled. Be careful, have a glass of water ready, and most importantly, do not bring the workpiece too close to the fire. Keep in mind that if you overdo it, the edges will turn black, which is not always desirable. However, sometimes it is the blackened edges that give homemade flowers realism or originality. Repeat this process with all remaining circles.

Step 3. Now, using scissors, make 4 cuts on each workpiece as shown in the diagram and photo below. The main thing here is to leave the center of the circle intact.


Step 4. Back to working with the candle again. This time we melt the newly obtained sections, pushing the sections apart with both hands. Repeat the procedure with all five petals.

Step 5. Set 2 large and 1 smallest pieces aside. We will return to them later, but for now let's work on the 2 remaining blanks, that is, the middle layers of peony petals. They need to be cut again according to the following pattern.

As a result, you will get twice as many petals.

Step 6. Use a candle to burn the new cut areas and set the pieces aside.
Step 7. It's time to make the peony stamens in the form of a small pompom from yellow floss threads. For this:
- Wind a whole strand of floss tightly around your index and middle fingers together. You should get about 8 turns.
- Now tie the middle of the resulting skein tightly (between two fingers) with the same yellow thread.
- Cut two loops, straighten the threads and trim the pompom if necessary.

Step 8. We begin to “assemble” the flower. Stack two large blanks on top of each other, which have only 4 petals, then put two blanks with 8 petals on them and, finally, complete the bud with the smallest blank with 4 petals.

Step 9. Hurray, the flower is almost ready! All that remains is to sew a yellow pompom to its center, simultaneously sewing all 5 layers of petals together.

If desired, glue/sew the necessary accessories, such as a pin, to the back of the bud to make a brooch out of the flower.

By changing the shape, color, size of the petals, their number and gluing principle, you can make not only peonies and roses, but also poppies (pictured), ranunculus, lilies and tulips.

And here is an example of flowers made from organza.

Master class No. 3. Frill flower in 5 minutes
Don't have hot glue, but have a needle and thread? Or did you suddenly need to make fabric flowers as quickly as possible? Then we hasten to introduce you to the technique of making flowers from frills.


You will need:
- Textile;
- Scissors;
- Needle and thread to match the fabric;
- Iron (optional).
Step 1. Cut the fabric into strips about 30 cm long and about 7-8 cm wide. You can choose other sizes to make smaller or larger flowers.
Step 2. Fold the strip in half lengthwise and iron the fold.

Step 3. Baste the workpiece with wide stitches at the bottom as shown in the photo below.

Step 4. Assemble the workpiece into an accordion, slowly pulling out the thread. Do not pull the thread too hard to avoid breaking it.

Step 5. Complete the circle by connecting the two ends of the ribbon and making a few stitches (tie a knot on the back side).

Step 6. Glue/sew beads, rhinestones or buttons into the center of the flower. Ready!

This method can be modified slightly if you want to make a more layered flower with raw cuts, such as linen or denim. Cut a wide, long strip of fabric, baste it down the middle from start to finish, gather it into an accordion shape, roll one edge of the strip into a log, and then start rolling the ribbon around it. Periodically, the layers of fabric need to be fixed with glue or stitches. Below in the photo slider there is a master class in pictures on making a flower from flax (scroll the photo to the right).


If you have a long length of fabric, you can make a flower of large diameter, for example, to decorate a pillow cover. To gather such a long ribbon, the easiest way is to use a sewing machine.

It is difficult to find a person who does not love fresh flowers, their beauty and freshness, and delicate aroma. Unfortunately, plants created by nature are not suitable for every situation: each of them lives according to its own rhythm and does not always bloom at the time we need. Compositions made from natural flowers quickly wither and lose their attractiveness; they are not suitable for permanent decoration. In stores it is not always possible to find bouquets made of fabric or polymer clay of the desired shape and color. The only way to get exactly what you want is to make artificial flowers with your own hands.
Imagine the envious glances of women and the admiration of men when you appear at a gala meeting in an elegant outfit, decorated with bouquets of delightful flowers. This decor will turn an ordinary hat into a flirty accessory; a single flower on a blouse will add piquancy to your entire look. Place bright flower arrangements in your apartment or office, or even just one flower, and the room will immediately come to life and become cozier.


When you admire a magnificent designer bouquet of artificial flowers, the thought may settle in your head: “I will never succeed.” Of course, it won’t work if you just look and doubt - get to work, and after a while your products will be difficult to distinguish from real flowers. It is not necessary to enroll in long, expensive courses; you can master this skill at home. It’s easy to learn how to create flowers from fabric; the master class will give you the necessary tips.

Basic materials used in flower making
To ensure that the work goes without annoying delays, prepare everything you need in advance. Let's start with choosing fabric. It is better for beginning craftsmen to use densely woven fabric; it holds its shape well. Please note that coarse, ugly fabrics will not make an elegant product; use shiny dense silk, satin or velvet. Try combining different types of fabrics, this way you will better reflect the diversity of the floral world. Perhaps you have some beautiful scraps left from some handicraft - do not neglect small scraps, it is very convenient to work with them.

The material has been selected, but before cutting can begin, it must be treated with a special compound.
Pour 3 teaspoons of gelatin with a glass of water, let it brew and heat until completely dissolved.
Soak the fabric in the solution and dry without wringing. After complete drying, the fabric is ready for cutting.
Fabric flowers step by step
Pattern of the future flower
Before you start cutting fabric, remember two basic rules. Firstly, any part should be located at an angle of 45 degrees to the grain thread; secondly, when transferring the outline to the material, you cannot use pencils and pens; a trace from them will ruin the entire appearance of the product. There are special crayons that are also great for drawing small pieces of soap on fabric.
Start by making a flower with 18 petals. Draw a pattern of a large, medium and small petal on paper and see if you have calculated their proportions correctly. The shape depends on your imagination, but at first it is better to avoid too fancy configurations. Start by copying the petals of a living flower; when you gain experience, you will be able to come up with the most intricate options.

Cut out 6 pieces of each size from the fabric and label them immediately. Be sure to indicate whether it is the large, small or middle part of the flower and mark the right and left sides. On the table everything seems clear, but after a while, if you don’t mark the cut, it will be difficult to understand the small shreds.
Making corrugated petals
Your fabric flower will look much more beautiful if the petals are made corrugated. The work will require the finest fabric, and at the same time it must be very durable, for example, chiffon or organza. Place the piece folded in half on additional material so that the fold line is 45 degrees with the grain of the thin fabric.

Press the entire surface of the petal firmly onto a flat surface and pull the additional fabric, turning it counterclockwise. The strength of the thin material plays an important role here; if it breaks, you will have to start all over again. Corrugated petals gain volume and look more natural.
Flower assembly
The finished petals need to be collected into a corolla. Sew the larger pieces to each other and close the circle. To give the petals a bulge, make small folds at the bottom of each of them. The next turn forms a medium-sized cut; the smallest details complete the work.
Final finishing
The main work is done, now you need to close the stitches holding the petals together. To do this, cut a circle out of fabric, fold it in four and secure the sharp corner in the center of the flower with an invisible seam. Glue another circle on the outside, it will cover all the threads, and the fabric flower will look like a living plant. They can be used to decorate, for example, a baby’s hat.

Additional materials for making flowers
The choice of glue and paints is a responsible matter: these materials can ruin the entire work.
Paints and dyes
The color of the petals should be clean and even; when using low-quality dyes, stains and unpainted areas appear; such a product is unlikely to decorate clothes or interiors. To give the fabric the desired color, you can use aniline and food dyes, photo paints, ink and ink.
By mixing the three primary colors in various proportions: red, yellow and blue, you can get any shade. The color intensity can be adjusted by diluting the dye. For dilution, water is used, or preferably alcohol or vodka, they give the color brightness and freshness. Mascara is used to make black parts, and if you dilute it, you get a gray dye.

Consider fresh flowers; they are very rarely colored the same throughout their entire volume. Combine shades and color intensity, and the product will take on a natural look.
High quality glue
To create high-quality artificial flowers with your own hands, you need good glue.
The main requirement: after drying, the glue should not leave marks or change the color of the petals.
In addition, it must have sufficient strength so that the product does not fall apart on the second day after production. Trade offers many different types of glue, but its properties may not always satisfy the buyer.
Glue at home
Prepare the glue yourself, then you will be sure of the quality of the material. To make flowers, only two types of glue are enough.
To cook flour paste, stir 2 tbsp. spoons of flour in water (the mixture should be as thick as liquid sour cream). The solution is heated, stirring, until the flour is brewed and the paste becomes translucent.
To prepare gelatin glue, soak 1 teaspoon of gelatin in a glass of cold water. When it swells, add a teaspoon of granulated sugar and 2 tbsp. spoons of flour, place on low heat and, stirring constantly, bring to a boil.
Handmade products always attract special attention. And it doesn’t matter at all where exactly they will be used. For example, a fabric flower can be turned into an elegant brooch, a decorative accessory, or even attached instead of a bow to a gift. It all depends solely on your imagination and preferences.


How to make a flower from organza?
Perhaps the most popular material for making flowers is organza. The thing is that it is quite easy to process, so even a beginner can repeat the master class presented below.

To work you will need the following:
- organza or chiffon, white or pink silk;
- yellow floss threads;
- scissors;
- needle;
- candle;
- matches.

Carefully cut out five circles from the fabric. Four of them should be approximately 10 cm in diameter, and one should be 8 cm. The dimensions may vary depending on what kind of flower you want to make.

Carefully light the candle and begin processing the material. We bring the edge quite close to the fire and gradually turn it until the edges melt. This must be done carefully so that they do not turn black. We repeat the same with the rest of the blanks.

We make cuts on each workpiece, as shown in the photo.


We carefully process the cuts of the workpieces using fire.

We set aside two pieces of the same size and one small one. On the remaining two we make cuts as shown in the diagram.

We process the edges as in the previous steps.

Let's start creating the stamens. We wrap the floss around two fingers folded together approximately eight to ten times. We tie the ends of the thread in the middle between the fingers. Cut the loops and straighten the threads.

We fold two large blanks that have four petals. On top of them we place two more large blanks. We place a small one on top.

We place the stamens on top of the blank and sew all the parts together.

If desired, such a flower can be used as a brooch if you sew a pin or any other accessories to it.

Such a flower looks no less attractive as a napkin holder or instead of a bow on a gift.


DIY fabric flowers
Perhaps the fastest way to make flowers is to use linen or burlap. Such products are great for decorating curtains, wicker baskets or serving.

We will need:
- strip of linen or burlap;
- glue gun;
- scissors;
- lace ribbon.
Cut a strip of linen or burlap to the required size.

If desired, you can glue lace ribbon to the fabric. In this case, the flower will be in the Provence style.

Fold the fabric in half with the wrong side facing in.

We bend one corner as shown in the photo.

Fold the folded corner of the fabric slightly.


Carefully twist the fabric so that the raw edge is either below or above.


Please note that it is more convenient to twist the rosette if you hold it with two fingers.

We wrap the tip of the strip in the opposite direction of the flower and fix it with glue.

If desired, you can fix those places where the fabric does not hold well.

As a result, fabric roses look very beautiful.

Felt flower arrangement

We will prepare the following materials:
- felt of different shades;
- scissors;
- printed template;
- pencil;
- thick cardboard;
- glue;
- kraft paper;
- floral wire;
- basket for composition;
- pliers;
- twine;

Cut out the pre-printed flower template.

Transfer the flower template onto pink felt. If desired, you can choose any other shade.

Cut out the blank from felt.

Cut out a thin strip of felt of a different shade.

We make cuts on the strip. Glue it by the edge to the middle of the bright workpiece.

Apply glue to the strip and roll it up to form stamens.

Apply glue to the workpiece and roll it up so that you get a rose.


Transfer the second part of the template to green felt.

Cut out the part that will be the sepal.

We pierce it with floral wire in the center.

Apply glue to the wire with the sepals and carefully glue the flower.


We make several more of the same flowers in different shades.

Take a basket to create a composition. If the bottom has too large holes, then place thick cardboard on it.


Place moss in the basket. You can also use a floral sponge. In this case, it is no less suitable.

Place the flowers in the basket one by one. This must be done as carefully as possible so that all the parts are distributed evenly.

As a result, the arrangement of roses looks like in the photo.

To make it complete, we use craft paper and twine for decoration.

DIY organza flowers
Organza is an excellent material from which you can make light, airy flowers for decoration. You can use them as a brooch, an accent on a handbag, a dress, or to make a stylish belt.

To do this, we will prepare the following:
- organza;
- belt tape;
- scissors;
- beads;
- glue gun;
- candle;
- additional decor upon request.

From organza we cut out five circles and six petals, as shown in the diagram.

We process the edges of each part one by one using a candle. To do this, gradually move the edges of the workpiece near the fire. This must be done carefully so as not to damage them.

We stack the round-shaped blanks on top of each other, and arrange the petals in the shape of a flower. Glue them together in the center.

We glue beads in the center, as well as additional decor.

Glue the entire composition to an organza ribbon.

The original belt with fabric flowers is ready!

Calico flower

Necessary materials:
- chintz;
- needle;
- scissors;
- button;
- thread to match the material.

Cut a fairly wide strip of fabric. Starting from one edge, collect it using a needle and thread and sew it up.

From the fabric we cut out a circle larger than a button. We wrap it and sew the edges.

Sew a button into the center of the flower.

A beautiful flower is ready! It can be used as decoration on clothes or accessories.

Making beautiful flowers from fabric is not at all difficult. Just follow the step-by-step master class and the result will pleasantly surprise you.

The abundance of fashionable and affordable ways to decorate clothes and interior details creates enormous opportunities for creative self-realization, but often there is not enough time for delights or the object of decoration does not require or is not worth the colossal costs of serious decoration. It is in such cases that ingenuity and what is popularly called “grandmother’s secrets” come to the rescue - simple-to-use elements that can be made in a matter of minutes.
Volume applique
Plants using the appliqué technique have long become a common way of decorating clothes and accessories. A voluminous applique will help diversify a boring pattern, with which you can decorate the edge of the neckline of a dress, the hem of a coat or a handbag. Volumetric flowers look impressive if they are asymmetrically located on only one side of the product (for example, on the shoulder).
To decorate clothes with raised flowers you will need:
- stretch material;
- filler (sintepon).
 When planning to make convex flowers from fabric with your own hands, it is best to choose a material whose edge does not fray when trimmed. The loose edge should be trimmed with curly scissors and an allowance should be left for the hem.
- To ensure that the edges of the allowance do not turn away when attaching the applique to the base, they must first be ironed.
- You should not immediately attach the element along the entire contour - 3-4 cm will be needed for stuffing with filler.
- When the filler is laid, the hole can be stitched. You can add texture by placing decorative stitches around the center of the flower and on the leaves.
As a basis for convex plants, it is better to use dense material that is not prone to deformation.

Embroidery ribbons
Within the art of embroidery, there is a separate decorative direction, which involves creating pictures from ribbons sewn to a base. This is quite painstaking and difficult work, but using this principle you can decorate clothes even without experience.
You will need ribbons with the following width:
- 3 cm;
- 2 cm;
- 1 cm;
- a circle of fabric for the base;
- beads.
The optimal material for making such flora is satin ribbons or plain braid. An organza ribbon will also give an excellent result, but you need to get used to working with it.
- The tapes are folded one on top of the other so that their longitudinal axes coincide.
- Using a basting stitch, the ribbons are gathered together and slightly gathered.
- The bud is formed in a spiral and pinned to a round base. All that remains is to sew on the inflorescence, hide the unsightly ends of the ribbons and the decor with fabric flowers is ready.
This method can be used to create not only lush buds on the fabric, but also textured ornaments, and by “getting your hands on” you can dispense with the fastening element (base) and form a pattern on the product.

Volumetric printed decorations
Not limited to finishing clothes and accessories, you can make jewelry from flowers from fabric - a necklace, beads or bracelet. This simple idea from the point of view of production technology is based on the principle of sewing soft toys from two or more parts.
To make one printed flower you will need:
- nylon or dense (stretchy) fabric;
- padding polyester;
- decorative thread or thin lace;
- buttons;
- fastenings for jewelry (clasps, chain, connecting rings).
Using the template, you need to cut out two identical flowers from the fabric.
- Fold with the wrong sides facing out and sew along the edge (remembering to leave a gap for filling with padding polyester).
- Turn the product right side out and fill.
- Sew up the technological hole.
- Wind decorative thread crosswise in the recesses between the petals and decorate with buttons.
- Sew connecting rings and secure them to a chain or use pieces of a chain to connect several flowers in series into a complex decoration.
When working with nylon, you need to treat its edge with a candle because of the fabric’s tendency to fray excessively. Since you can make flowers from fabric that stretches well and strongly by pulling it with a rope, there is no need to cut out complex shapes - you can cut two circles from nylon.

Rose from a rope
Roses made from rope or strips of fabric are often used to decorate belts, headbands and other accessories. Such structures are secured manually using a seam over the edge or using glue.
- Fold a strip of fabric 5 cm wide in half along the longitudinal side with the wrong side facing out and stitch.
- Turn right side out (it is important that the seam does not twist).
- Using a basting stitch, gather slightly and sew to the product along the edge of the connecting seam.
- To decorate a handbag or hair decoration, the sewing edge (after forming a flower with pins) is smeared with glue and connected to the base.
A rope or thick decorative cord is immediately glued to the product during the formation of the inflorescence. For reliability, the cord is sewn to the base around the perimeter.

Knitwear decor
In most cases, to create fabric flowers, a master class requires a large number of step-by-step illustrations. You can make simple but expressive plants for decorating knitwear from any dense and fairly thick fabric that is not prone to fraying - felt or fleece.
You can make two types of flowers - double and simple with curved petals.
- For the first, you will need a long strip of fabric 4-6 cm wide, folded in half and stitched along the connecting edge (no need to turn it inside out).
- The resulting element should be rolled in a spiral and sewn to the product from the side where the layers meet (i.e., the place where the material is folded forms the front part) - you will get a rosette resembling a rose made from a rope.
- Using scissors, you need to make cuts in increments of 0.3-0.5 cm to create the petals of the inflorescence.
To make a textured flower with petals, you need to cut 6 petals from fabric (the base of the petal should be straight). Make an opposite fold on each one and assemble it into a bud using a needle and thread.
The middle of the flower can be decorated with beads or a bright button.
The leaves in such compositions are sewn to the product along the longitudinal axis.

Cosmic flowers
Inflorescences, whose silhouette is formed using folds of the material, can be used to decorate clothes, furniture covers, clutches and handbags. These elements are based on a circle and are good because they have minimal volume and practically do not lose their appearance after washing.
For production you will need:
- hard woven dublerin;
- decorative material;
- thread;
- bead or button.

When choosing dublerin, it is better to purchase the hardest one with the adhesive side.
- Using the template, you need to cut out a base circle from dublerin.
- The radius of each inflorescence is cut out 2 times larger than the base, so that the decorative material covers the doublet on both sides.
- If the decorative material is prone to shedding, then it must be cut using curly scissors with a margin of 0.5 mm for the hem.
- The doublerin is placed in the middle of the inflorescence blank from the wrong side and ironed through gauze so that the two fabrics stick together.
- The allowance is pressed to the wrong side.
- The material is gathered to the center, secured with thread and decorated with a bead or button.
You can secure such a flower to the product by stitching it along the contour.
It is important to remember that the decor will last a long time not only due to the absence of complex and multi-component elements, but also provided that the base fabric and the material used for decoration have the same characteristics and care requirements - dyeing method, temperature and washing technique.


- Installing knives on an electric planer
- Practical wood carving tips for beginners
- Design of a sauna stove - types and design features Round sauna stove
- Photos of small houses and how to build them yourself Stylish small house
- Cold restoration of facade ceramics
- Aluminum casting at home: making molds, technological process Using a stove
- How to carve a monkey from wood with your own hands: photos and ideas for beginners and carving masters
- Wall decor - DIY paper fan Crafted round paper fan for decoration
- The refrigerator does not freeze, but the freezer works. LG two-chamber refrigerator freezer does not work.
- The correct approach to installing a built-in dishwasher
- Biogas from manure: how profitable it is and how to make Biogas from manure with your own hands
- We make firewood sheds and woodpiles with our own hands
- Master class “Kite” What is a kite made of
- Simple and original ideas for those who don’t know how to make a bird feeder with their own hands from scrap materials How to decorate a bird feeder from a box
- Molds made from epoxy and scrap materials
- DIY treehouse DIY treehouse for kids
- Surviving in winter without a tent How to make a cave from a tunnel
- We make templates for roses from foamiran on our own
- A vase made of newspaper tubes and a topiary made from natural material “autumn colors” Preparation of the necessary materials
- Electric motor soft start device